Connect UniFi Access to your club
Connect your club's UniFi Access console so every booking gets its own door code and you can unlock mapped doors from the OpenCourt app.
Connect your club's UniFi Access console so every booking gets its own door code automatically, and so you and your customers can unlock a mapped door from the OpenCourt app. (About 5 minutes. You'll need admin access, your console reachable from the internet, and a scoped UniFi Access API token.)
Read this before you buy or configure anything: your console must NOT be enrolled in UniFi Identity Enterprise.
UniFi Identity Enterprise (also written UID Enterprise) is Ubiquiti's cloud-managed identity mode. Any console enrolled in it has the local Access API switched off, and OpenCourt cannot connect to it at all. This is not a setting we can work around, and no amount of tunnelling, port-forwarding, or token fiddling changes it. If your console is enrolled, OpenCourt's connect attempt fails with "This console runs UniFi Identity Enterprise, which disables the local API."
Use standard UniFi Access. If a console is already on Identity Enterprise, it has to be moved back to standalone UniFi Access before it can be connected — so tell your installer this before they set the console up, not after. Undoing it later is far more work than avoiding it.
You need access-control permission. The page is under Settings → Access Controls.
What you'll need (and who sets it up)
UniFi Access is a complete access-control system, not a single device — neither a hub nor a reader alone will open a door. For one door you'll typically need:
A UniFi console that can run the UniFi Access application — see the warning below, because not every UniFi console can.
An Access Control Hub — the door controller the reader and lock connect to. Ubiquiti sells several: Door Hub, Door Hub Mini (the compact single-door one), Gate Hub, Elevator Hub, Enterprise Access Hub (up to 8 doors), and Retrofit Hub. Pick by application, not by price — a gate needs the Gate Hub, not a Door Hub.
A reader with PIN support — see the table below. This is the one choice that decides whether booking codes work at all, so don't let it be made on price.
An electric lock or strike, plus the usual door hardware.
Networking — the hubs and readers are PoE-powered, and some hubs need the higher PoE++ standard rather than ordinary PoE, so a suitable switch or injector may be required. Your installer will size this; you don't need to work it out yourself.
A way for OpenCourt to reach the console (the next section).
Not every UniFi console can run UniFi Access — check yours before you buy hardware. This catches people out because the console is usually already installed, and the Access application simply isn't offered on it.
As of August 2026, Ubiquiti lists these as compatible: Dream Machine Pro (UDM-Pro), Dream Machine Special Edition (UDM-SE), Dream Machine Pro Max (UDM-Pro-Max), Dream Wall (UDW), Dream Router 7 (UDR7), Dream Router (UDR), Cloud Gateway Max (UCG-Max), Cloud Gateway Fiber (UCG-Fiber), CloudKey+ (UCK-G2-PLUS), Network Video Recorder (UNVR), NVR Pro (UNVR-Pro), and Enterprise NVR (ENVR).
Ubiquiti maintains this list and it changes as new hardware ships, so treat the version on their site as authoritative: UniFi Consoles with UniFi Access Support.
You may not need to replace your gateway. Ubiquiti's own guidance is to add a supplementary console — a CloudKey+ or an NVR — alongside the one you have, and let it run Access. Site Manager still manages everything together.
Your installer should set up the UniFi Access application and the door itself. That means installing the Access application on the console, adopting the hub and reader, creating the door, and wiring the lock. It's routine work for anyone who does UniFi installs, and we don't document it here — Ubiquiti's Getting Started with UniFi Access is the reference to hand them.
You'll know that part is finished when the door appears in UniFi Access showing a status of Locked. That's the point to come back to this guide.
Which UniFi readers accept booking codes
Booking codes require a PIN-capable reader. This is a hardware decision, and it cannot be fixed in software later. Several UniFi readers have no keypad at all, and a reader without a keypad can never accept a booking code — there is nowhere to type it.
OpenCourt cannot detect which reader you installed. Every UniFi door reports itself as able to take codes, so if the reader has no keypad, OpenCourt will still generate a code for each booking and your customers will simply have no way to enter it. Nothing will look broken until a customer is standing at the door.
Check the model against the table below before you order. If a non-PIN reader is already installed, OpenCourt can still unlock the door from the app — but per-booking codes won't work until the reader is replaced.
G6 Entry and G6 Pro Entry are not the same device. Only the Pro accepts PIN codes. The names differ by one word and the price differs by a lot less than you'd expect — check the model before you buy.
Access Ultra is an integrated hub and reader, and it still has no PIN. It looks like the tidy all-in-one choice for a single door, and it will never accept a booking code.
A reader on its own does nothing — it has to be wired to an Access Control Hub. Ubiquiti requires the reader to connect directly to the hub (same VLAN, Layer-2 Ethernet). Without a hub, a camera-style reader like the G6 Pro Entry is adopted into UniFi Protect only and never appears in UniFi Access — which is the application OpenCourt talks to, so we can't see the door at all. The hub is also the only part of the chain with a relay to actually throw the lock.
Recent Access versions (3.2.42 and later) do let a non-camera reader run from a plain PoE switch, and it will show up in UniFi Access that way — but door unlocking isn't supported in that state, so it still gives OpenCourt nothing to work with.
If you already own a reader and no hub, that's a small addition rather than a redo — a Door Hub Mini covers a single door. It does mean re-running the reader's Ethernet to the hub, so it's an installer visit, not a settings change.
OpenCourt doesn't spec, supply, or install the UniFi hardware — that's the UniFi side. If you're new to UniFi Access, work with a UniFi/Ubiquiti installer or IT person; it's straightforward for anyone who does this regularly. We'll happily share these guides with them, but the install itself is on your side.
How OpenCourt reaches your console
UniFi Access runs entirely on your own console — there is no UniFi cloud for door control. So unlike Seam or RemoteLock, where you just sign in to an account, something has to give OpenCourt a route to a box sitting in your building. Sort this out before you connect, because it produces the address you'll paste in later.
There are two supported ways. We recommend a port-forward, and the reason is reliability rather than convenience: it adds nothing to your building that can quietly stop working.
Why we recommend the port-forward
It adds no new hardware, no third-party account, and no software that has to keep running. Once the rule is in place, the only things that need to stay up are your internet connection and the console itself — and if either of those is down, your club has bigger problems than door codes.
A tunnel needs a computer that is powered on and running the helper program at all times. That machine becomes a part of your access-control system that nobody thinks of as part of your access-control system. When it reboots without restarting the helper, or its drive wears out, or an update stops the container, door codes stop and nothing appears to have changed. That is a much harder problem to spot than a firewall rule someone edited.
A tunnel cannot run on the UniFi console itself. UniFi OS firmware updates erase anything installed outside the supported applications, so an update would silently break door access. It has to be a separate always-on device.
Choose the Cloudflare Tunnel instead if any of these are true
Your ISP uses CGNAT. Then a port-forward is impossible, not merely inadvisable. This is common on fixed wireless, mobile broadband and Starlink. The test: if your router's WAN address starts
100.64.through100.127., or doesn't match what a "what's my IP" search reports, you are behind CGNAT.You can't get a static IP and don't want to rely on DDNS.
Your organisation's IT policy is not to open inbound ports. Some clubs inside a larger business or a landlord's network have this rule set for them.
You already run an always-on NAS or server and are comfortable maintaining it. Then the main drawback largely goes away.
→ Make your UniFi console reachable (Cloudflare Tunnel)
Setting up the port-forward
Four steps, all on your side. Your installer can do this in about ten minutes.
Give the console a fixed local IP address, or a DHCP reservation for it. Do this first. If the console's local address ever changes, the forwarding rule points at nothing.
Make your public address stable — a static IP from your ISP, or DDNS. ⚠️ Check before you buy anything: most business connections already have a public address, and what you might need to purchase is a static one so it stops changing. If you already have a static IP, or you're happy with DDNS, there is nothing to buy. UniFi has DDNS built in at Settings → Internet → your WAN → Dynamic DNS, which keeps this on your own equipment with nothing extra to run.
Forward TCP port
12445to the console's local IP.Test it from outside your network before connecting — use the token self-test below, run from a phone on cellular rather than on the club's Wi-Fi. A rule that works from inside the building proves nothing.
Steps 1 and 2 are what keep this working for years. Nearly every port-forward that fails later does so because the console's local IP moved or the club's public IP changed. Both are one-time settings.
Keep your API token private. With a port-forward, the token is what authorises access to your console, so treat it the way you'd treat a key: don't share it, don't reuse it anywhere else, and create a fresh one if it ever ends up somewhere public. This is the same arrangement businesses use every day for remote access to equipment on site.
Two easy habits make it stronger: set your PIN length to 6 digits (see What happens next), and delete any old tokens you're no longer using.
Whichever you pick, OpenCourt secures the connection to your console. On a tunnel you get a normal verified certificate. On a port-forward your console presents its own self-signed certificate, so OpenCourt records that certificate's identity the first time it connects and refuses to talk to anything that doesn't match it afterwards. Nothing for you to configure.
One consequence: if the console is ever factory reset, it generates a new certificate and OpenCourt will stop connecting on purpose. Reconnect on the Access Controls page and it re-records the new one. A normal firmware update does not do this.
Before you begin
You have a UniFi Access console (for example, a Dream Machine Pro Max) running the UniFi Access application, with at least one door connected through an Access Control Hub and a PIN-capable reader (see the table above). Remote unlock only works on a door bound to a hub.
Your console is NOT enrolled in UniFi Identity Enterprise. That mode turns off the local API OpenCourt connects to. Standard UniFi Access is what you want. (If it's already on Identity Enterprise, you'd need to move it back to standalone UniFi Access before connecting.)
Your console is reachable from the internet, by either a port-forward on 12445 or a Cloudflare Tunnel — see How OpenCourt reaches your console above. Either way, you come out of it with the Console address you'll paste in below.
Your console is running UniFi Access 1.9.2 or later — the version that introduced the API OpenCourt uses.
You have a scoped UniFi Access API token. Creating one takes a minute — see the next section.
Create the API token
This lives inside the UniFi Access application, not in UniFi Network or UniFi OS. Several UniFi applications have their own "Settings → General" page, so make sure Access is the selected application at the top of the console before you start. If your sidebar shows Policies & Schedules, Card Inventory, Touch Pass and Visitors, you're in the right place.
In the console, open the Access application, then go to Settings → General.
Scroll to the bottom of the page. API Token is the last row, below Data Retention and Network. Click Create New.
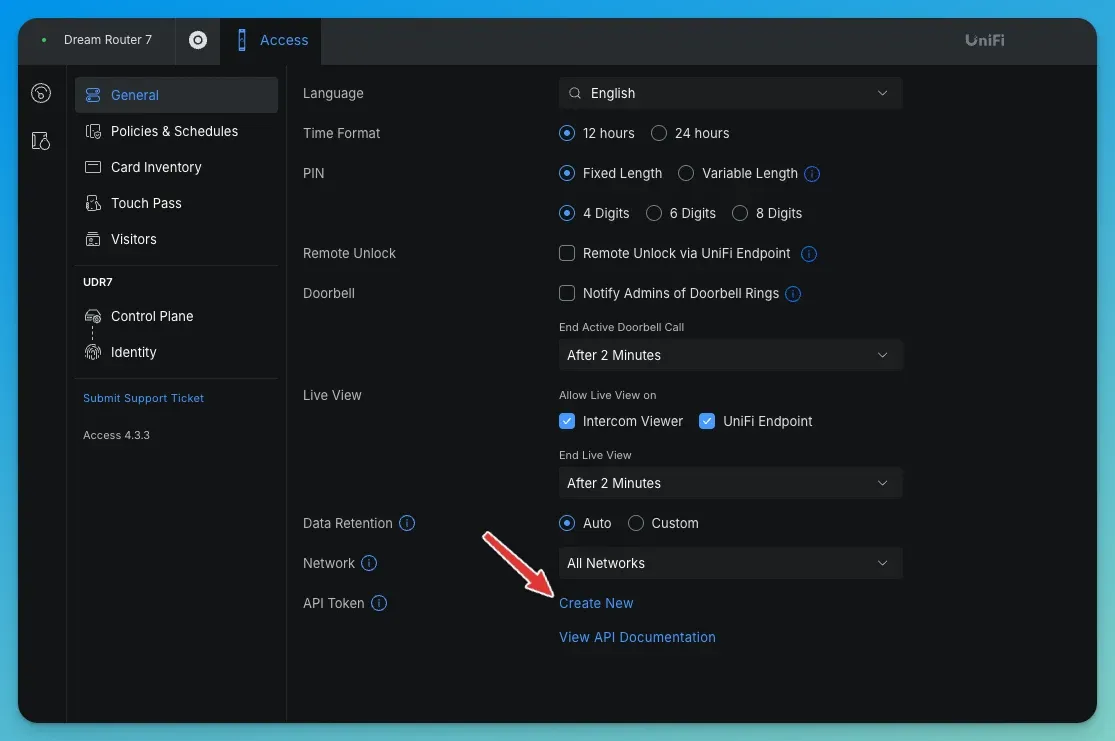
There's no "Advanced" section to look for — the token sits directly at the foot of the General page. Older Access versions placed it under Settings → Security → Advanced, so check there if your console is behind.
Fill in the dialog:
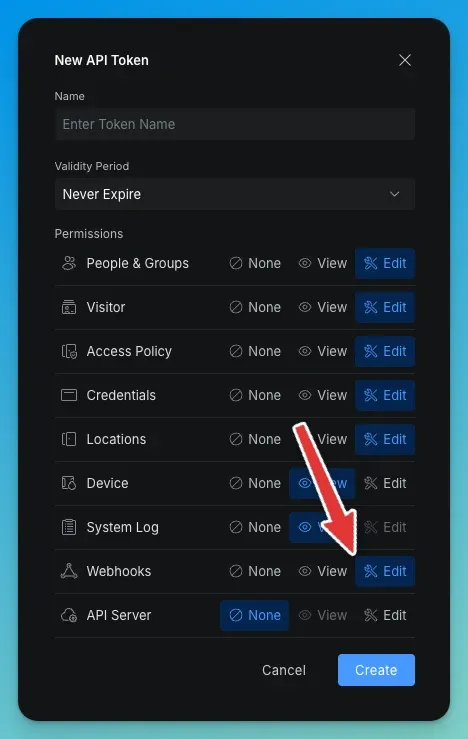
The screenshot above shows the finished state — Never Expire, and Webhooks on
Edit. Everything else is exactly as the dialog opened.Click Create, then copy the token immediately — see the warning below.
About those permissions
The dialog opens with sensible defaults, and Webhooks is the only one you have to change. It defaults to None, and OpenCourt uses it to receive door events from your console, so the connection won't work without it.
For reference, this is what OpenCourt actually uses each one for:
Set Validity Period to Never Expire. If you pick a fixed period, the token silently stops working when it ends — and the first sign is a customer standing at a door their code no longer opens, weeks or months after everything was set up correctly. Nothing warns you beforehand.
If your security policy won't allow a non-expiring token, that's fine — but write the expiry date in your calendar with a reminder a week ahead, and reconnect with a fresh token before it lapses.
UniFi shows the token only once. Copy it before you close the dialog, and paste it somewhere safe. If you lose it you can't retrieve it — you'll have to delete it and create another.
Optional: have your installer test the token first
This is worth 30 seconds, because it tells you which side a problem is on before you involve anyone. Your installer runs it from any computer on the same network as the console, replacing the address and the token:
``bash curl -i -k 'https://CONSOLE-IP:12445/api/v1/developer/users' \ -H 'Authorization: Bearer YOUR_TOKEN' ``
"code": "SUCCESS"with a list of users — the console, the API and the token are all good. Any later failure is about reachability from the internet, not about UniFi.HTTP 401withCODE_UNAUTHORIZED— the token is wrong, was deleted, or has expired. Create a new one.Nothing connects at all — UniFi Access isn't installed on that console, or the address or port is wrong.
HTTP 200 on its own does not mean success — read the code field. UniFi returns HTTP 200 for most failures and puts the real result in the response body. A bad token is the exception and does return a genuine 401, but almost everything else arrives as HTTP 200 with a code other than SUCCESS, for example:
`` HTTP 200 {"code": "CODE_USER_WORKER_NOT_EXISTS", "msg": "User not found."} ``
So the test to apply is "code": "SUCCESS", never the HTTP status. This trips up almost everyone troubleshooting the UniFi API for the first time.
The -k is expected and correct. The console presents its own self-signed certificate on port 12445, which is normal for local UniFi Access, and OpenCourt handles that certificate properly when it connects.
Run the same test from outside the club (port-forward only)
Once the forward is in place, repeat the command using your public address and from a connection that is not the club's Wi-Fi — a phone hotspot works:
``bash curl -i -k 'https://your-host.example.com:12445/api/v1/developer/users' \ -H 'Authorization: Bearer YOUR_TOKEN' ``
This is the check that matters. A forward that works from inside the building proves nothing at all, because traffic never leaves your network. If this succeeds, OpenCourt can reach your console.
Steps
In the admin app, go to Settings → Access Controls. You land on the Locks tab. With nothing connected yet you'll see No access control system connected.
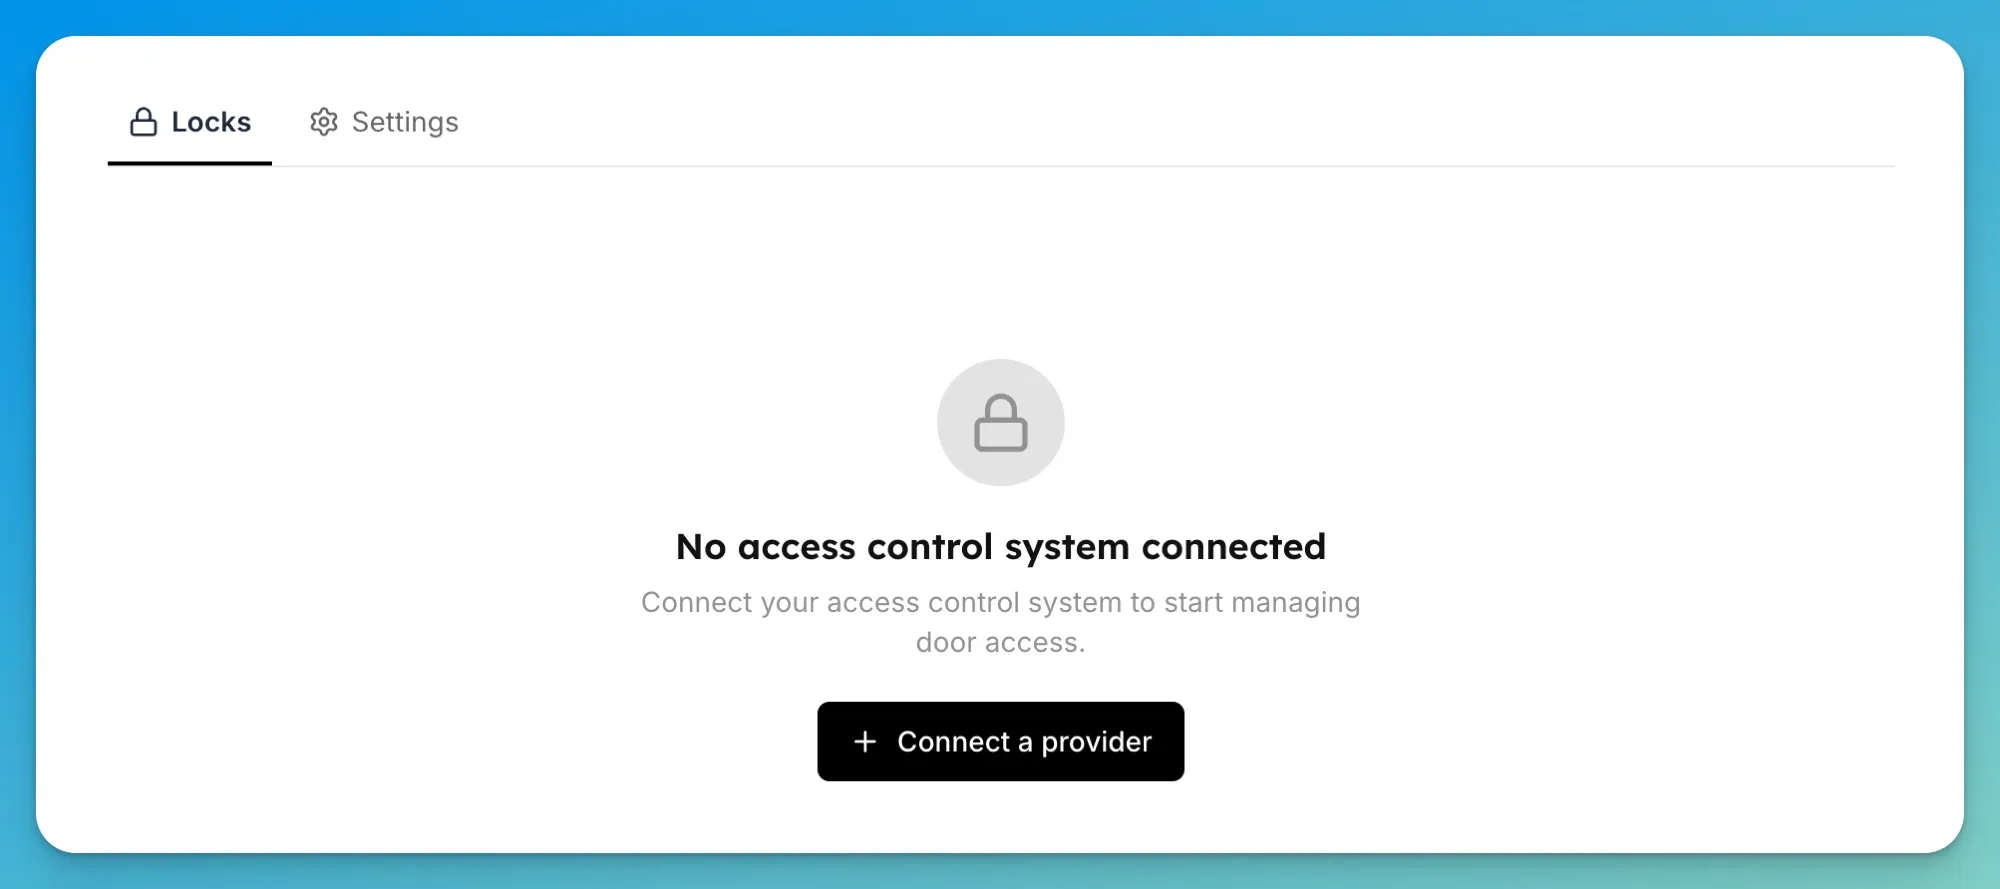
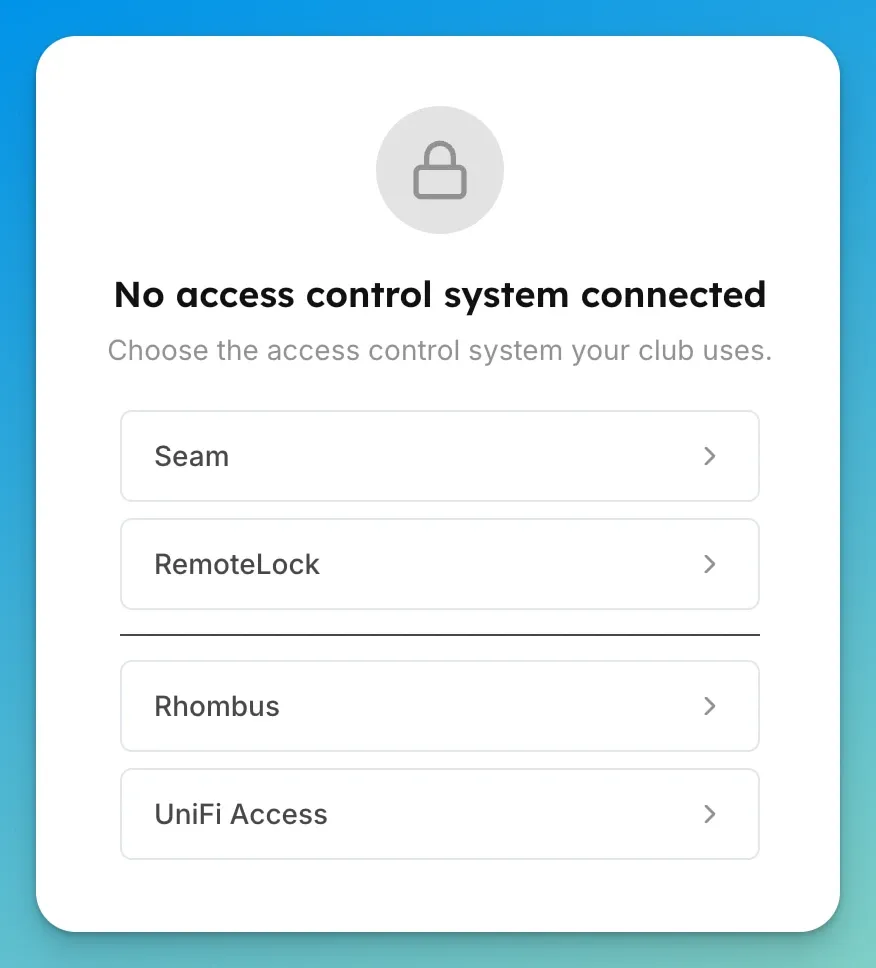
Click Connect a provider, then choose UniFi Access. A dialog opens.
Under How is the console reached?, pick the one that matches what you actually set up — Direct / port-forward (recommended) or Cloudflare Tunnel.
Pick the one you built, not the one marked recommended. Choosing the wrong option here is the most common reason a correct address and a valid token still fail to connect, because the two verify your console's certificate in different ways.
In Console address, paste your console's address. For a port-forward that's the full address including the port (for example
https://your-host.example.com:12445); for a tunnel it's just the hostname (for exampleaccess.yourclub.com).In API token, paste the scoped token you created, then click Connect.
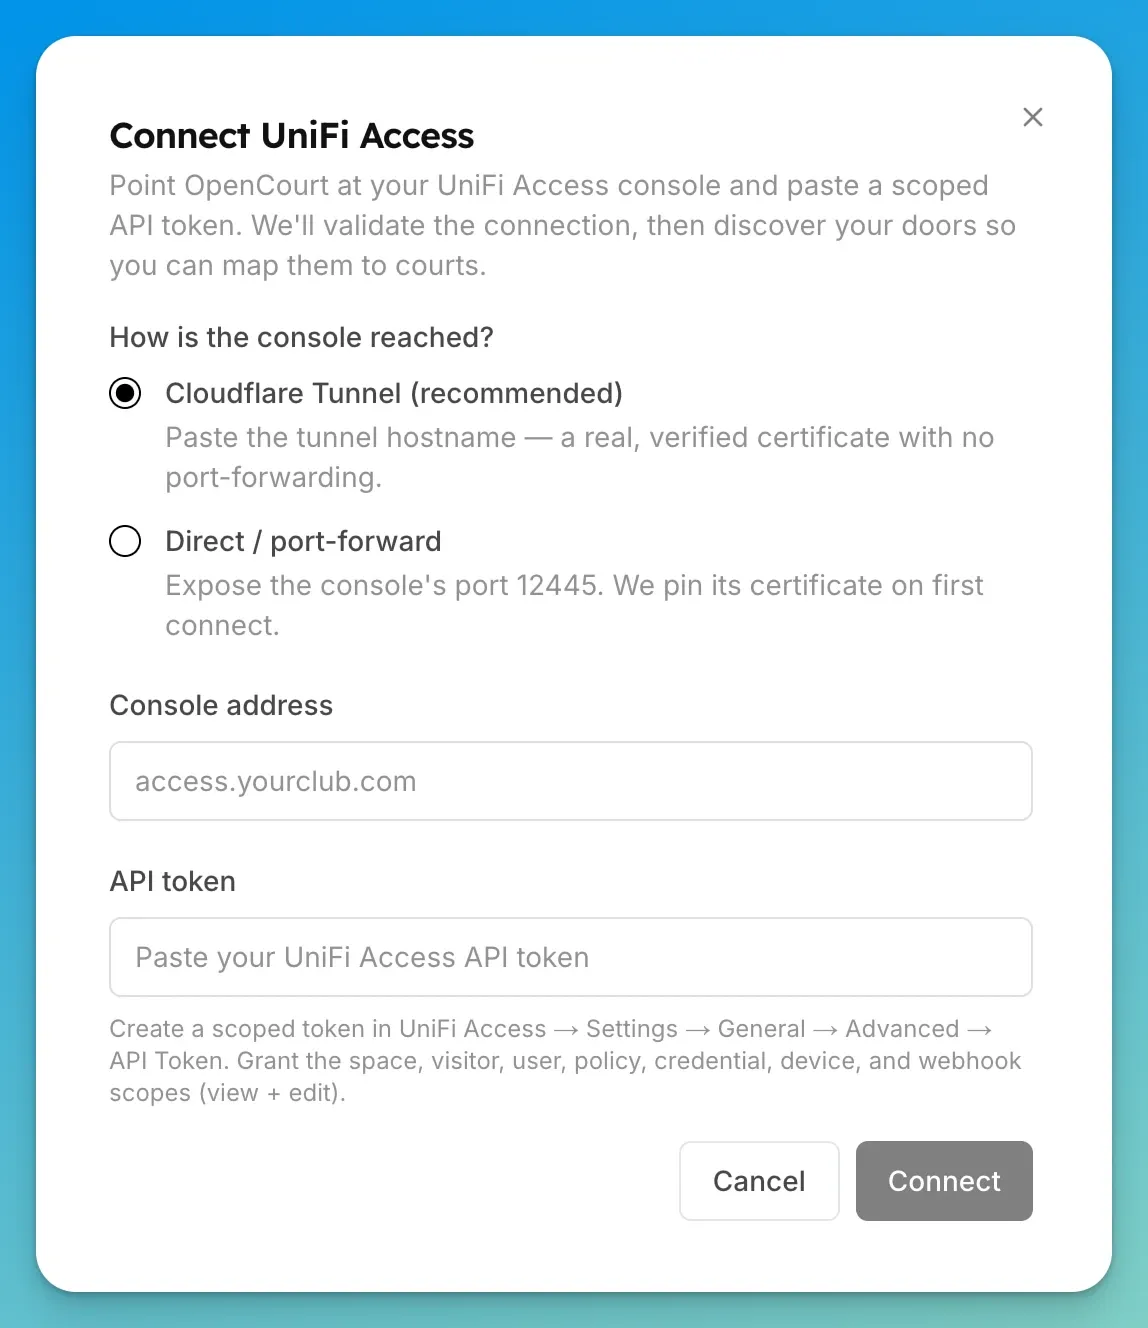
The dialog summarises the difference: Direct / port-forward (recommended) — "Port 12445 forwarded to the console. Nothing extra to run" — versus Cloudflare Tunnel — "no open ports. Needs an always-on device running the tunnel helper."
OpenCourt validates the token against your console, sets up push notifications for door events, and discovers your doors. You return to the Access Controls page, which now shows UniFi Access connected and the doors it found.
Map each door to a space. Switch to the Settings tab and find Court-to-Lock Mapping — the heading follows your club's wording. Choose a door for each space and click Save. This is what tells OpenCourt which door belongs to which space, so the right codes and unlock permissions apply.
The door names in this list come straight from UniFi, and they're longer than what your installer typed. UniFi builds each label as console name → floor or location → door name, so a door someone named
OpenCourt Doorshows up here asDream Router 7 - 1F - OpenCourt Door.Two things follow from that. Name doors after the space they serve —
Bay 1,Court 3,Front Entrance— never leaving a default likeDoor c84b. And name your floors and locations in UniFi sensibly too, because they appear in every label here and are what tells two similar doors apart.Renaming a door in UniFi later is safe and the mapping survives. Deleting a door and recreating it is not — the new one has to be mapped again.
Choose who can unlock, and when. Open a door and use its Door access section to control who can unlock it from the app and during which times. See Set who can unlock doors from the app.
What happens next
When a customer books a mapped space, OpenCourt creates a door code on your console that works only for that booking's time window, then removes it afterward — nothing to hand out or revoke. On doors bound to a hub, you can also unlock a mapped door yourself from its page in the admin app, and customers can unlock from the OpenCourt app during their booking (according to the access rules you set). The door opens momentarily and then relocks on its own.
Set your PIN length to 6 digits — UniFi defaults to 4.
Your console decides how long the codes are, not OpenCourt. The codes are generated by UniFi Access itself, using the PIN setting in UniFi Access → Settings → General. Out of the box that's Fixed Length, 4 Digits — only 10,000 possible codes, on a door that may be unattended 24/7. Selecting 6 Digits takes it to a million and costs your customers two extra taps.
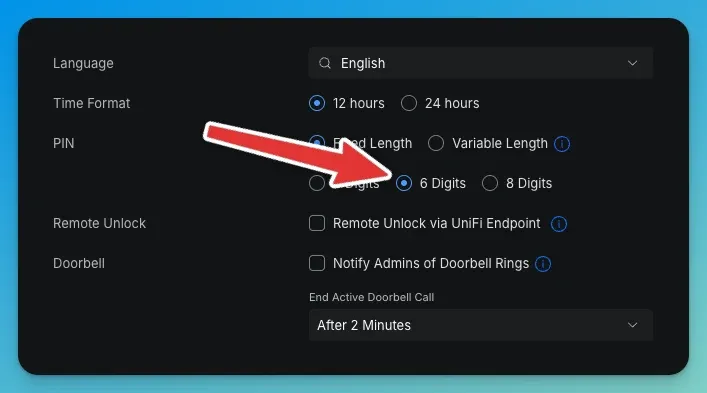
The change applies to codes issued from then on. Codes already out with customers keep working, so it's safe to change at any time.
Everything OpenCourt creates is added alongside your console's own setup — your existing cards, PINs, and policies keep working exactly as before, and OpenCourt only ever removes the codes it created.
If something goes wrong
Narrow it down first — three questions
Answering these before you check anything saves most of the work:
Is it one customer, or everyone? One customer is almost always their booking or their code, not your setup. Everyone means the connection between OpenCourt and your console.
Is it one door, or all doors? One door points at that door's hardware or its mapping. All doors points at the console or the connection.
Did anything change? A new router, an internet outage, a UniFi firmware update, an IT visit, a console reset. Access control breaks far more often because something else changed than on its own.
The five-minute self-check
Work down this list. It's ordered by how often each one turns out to be the cause.
✅ Is the API token still there? This is the most common cause by far. Open UniFi Access → Settings → General and look at the API Token row. If the token you created for OpenCourt is missing, it was deleted — by another admin, by a console restore, or by someone tidying up. If it's listed but shows an expiry date that has passed, it's dead too. Either way: create a new one (Never Expire, and remember Webhooks → Edit), then reconnect in OpenCourt with the new token.
✅ Is the console online? Check it in UniFi, or at
unifi.ui.com. A console that's rebooting for a firmware update is briefly unreachable and needs nothing from you but a few minutes.✅ Is the club's internet up? Nothing reaches your console without it.
✅ Does the door still exist in UniFi Access, and is it still bound to its hub? If the door was deleted and recreated, it's a new door as far as OpenCourt is concerned and needs re-mapping.
✅ Is the right reachability option still selected in OpenCourt? If your setup changed from a tunnel to a port-forward, or the other way, the option in OpenCourt has to change with it.
✅ Port-forward only — has your public address changed? Compare what a "what's my IP" search shows against the Console address saved in OpenCourt. If they differ, that's your answer, and a static IP or DDNS is the permanent fix.
✅ Tunnel only — is the always-on device still running the tunnel helper? Check that the machine is powered on and the helper is running, and that the tunnel shows Healthy in Cloudflare. A machine that rebooted without restarting the helper is the usual culprit.
The single most useful test is the self-test command above, run from outside the club. It separates "the console and token are fine" from "OpenCourt can't reach it," which is the fork every other question hangs off. Remember to judge it by "code": "SUCCESS", not by the HTTP status.
Specific symptoms
"This console runs UniFi Identity Enterprise, which disables the local API" — the console is enrolled in UniFi Identity Enterprise, which turns off the local API OpenCourt uses. Move the console back to standalone UniFi Access, then connect again.
"Couldn't connect — check the API token and its scopes" — the token was rejected. Confirm you copied the whole token and that it hasn't passed its validity period. The most common cause is
Webhooksleft atNone— it's the one permission the dialog doesn't grant by default. The token self-test above tells you in one command whether the token itself is the problem.It worked for months and then stopped — check the token's Validity Period. A token with a fixed period stops working the moment it expires, with no warning. Create a new one set to Never Expire and reconnect.
The Access application isn't offered on your console — not every UniFi console can run UniFi Access. Check the compatibility warning above, and note that adding a CloudKey+ or NVR alongside your existing gateway is usually cheaper than replacing it.
Codes are issued but customers can't enter them — the reader has no keypad. Check its model against the PIN-capable table above.
Can't reach the console — double-check the address, and confirm the console is online. For a tunnel, make sure the tunnel is running and the hostname resolves. For a port-forward, check that port 12445 is forwarded to the console's local IP, and test from outside your network — a phone on cellular, not the club's Wi-Fi. A rule that works from inside the building tells you nothing.
It worked, then stopped after an internet outage or a router change (port-forward) — your public IP probably changed. That's what a static IP or DDNS prevents. Update the Console address in OpenCourt, then fix the underlying cause so it doesn't recur.
Port-forwarding won't work at all, from anywhere — you may be behind CGNAT, where your ISP shares one address between customers. Check whether your router's WAN address starts
100.64.–100.127., or differs from what a "what's my IP" search shows. If so, ask your ISP for a public IP, or use the Cloudflare Tunnel instead — it works behind CGNAT.Everything stopped right after the console was factory reset (port-forward) — expected. The console generated a new certificate, and OpenCourt deliberately refuses to connect to one it doesn't recognise. Reconnect on the Access Controls page.
A door shows no remote-unlock option — remote unlock only works on doors bound to an Access Control Hub. Door codes still work on any PIN-capable reader on that hub.
A reader you installed doesn't appear in UniFi Access at all — it isn't wired to an Access Control Hub. Camera-style readers (G6 Entry / G6 Pro Entry) adopt into UniFi Protect without one, which looks like a working install but leaves the door invisible to UniFi Access, and therefore to OpenCourt.
"The lock didn't respond" when unlocking — a temporary issue reaching the door (offline or busy). Wait a moment and try again.
Codes work, but door activity never appears in OpenCourt — the token is missing the Webhooks permission, which is the one the dialog leaves at
None. Codes and unlocking work without it, so everything looks fine until you notice the history is empty. Create a token with Webhooks → Edit and reconnect.A customer's code doesn't work, but everyone else's does — check the booking is for the space mapped to that door, and that the customer is trying during their booked window. Codes are created for the booking's time only. Also confirm they're entering it on a keypad reader, not tapping a card reader.
Still stuck? Send us this
If you contact us, these five things let us skip straight to the cause:
Whether it's one customer or everyone, and one door or all doors
What changed recently, if anything
The output of the self-test command run from outside the club — with the token itself removed
Your console's UniFi OS and Access version numbers (Access shows its version at the bottom of its sidebar)
How OpenCourt reaches the console — port-forward or tunnel
Email support@getopencourt.com. ⚠️ Never send us your API token — we don't need it, and you should replace any token that's been shared.